Import Cashbook Features in Sage 200
Sage 200 Cashbook Types
- BP - Bank Payment
- BR - Bank Receipt
The transaction type is set, either on the Header of the cashbook import, or on the lines of the import. See examples below.
Import Transaction Features in Sage 200
Simply add new lines to the spreadsheet from row 30 on-wards. Then press Import button, on the PostTrans Toolbar, to import single or multiple Sage 200 cashbook transactions (Examples shown below).
Advantages
- Detailed conformation before transaction importation
- Highlighted Validation of codes and data
- Search for Nominal, Tax code, Bank Account, etc using our In-Cell Searching
- Add formula, vba or macros to manipulate the imported data
- Cannot Post Sage transaction twice. Writes POSTED in row, with cashbook transaction URN ref generated.
- Easy importation from CSV file
Examples of importing Sage 200 Transactions
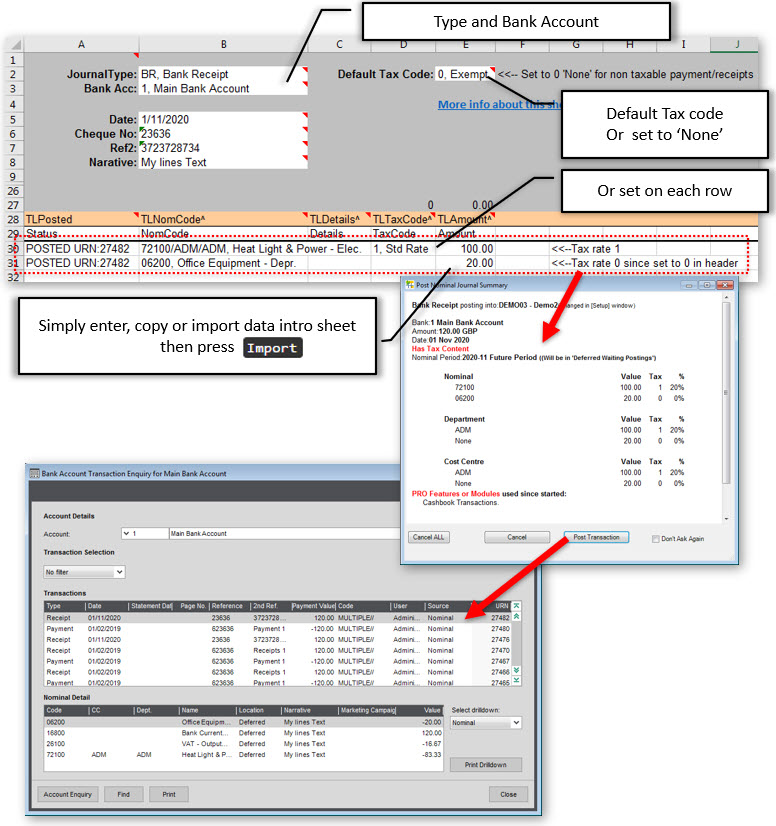
Posting Single Cashbook Transaction
Header values can be specified in the top portion of the PostTrans template, and/or in line items in rows 30 on-wards. The template structure detail is discussed in Template Structure (below this section).
Many examples are included with PostTrans for Sage 200. Press Examples button on the PostTrans toolbar and type "Cashbook" into search box to list all examples.
Multiple Cashbook Transactions
Multiple Cashbook Transactions can be imported by adding the Header fields to the Tag row 28. These are easily inserted using the Tags button, see all tags listed at the bottom of page.
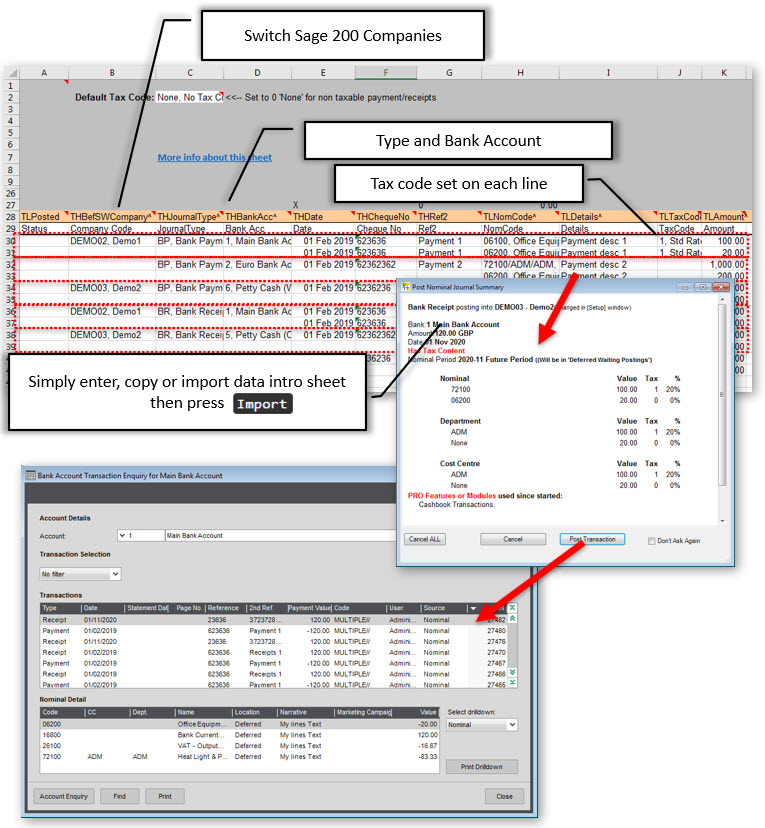
Indeed we can add tag "THBefSWCompany", in column B to allow us to post different Sage 200 Companies from the same sheet. We also override the Transaction type in column C.
Formula, VBA and macros can be added to further enhance this data entry template.
The Path the Cursor takes can also be defined
Customised User Defined Fields
For this type of import, PostTrans can be map Excel fields to customised user defined fields.
Common Features
In-Cell Searching
Any Tag ending with ^ will have a In-cell search facility to look up associated values. Use SPACE + TAB to see all values, or SPACE and
TEXT to perform a text search on description.
These are returned to the cell as "CODE, DESCRIPTION". PostTrans
only uses the CODE and ignores the comma and anything after it, thus data from a field
would only need the CODE part of the data if from an external imported
file.
In-cell Searching can be turned off by removing the ^ from the end of the tag name, or name in first line of comment (Header cells) to disable in-cell searching for a single column, or header cell.
All in-cell searching can be turned off in Setup. In-cell
searching.
Cursor Path
The path the cursor takes through the sheet, when entering data manually, can also be easily defined in
Setup. See Set Cursor Path
Importing the Data
Simply press the Import button to validate and import the data into Sage 200.
PostTrans will read the Header cells and then process the rows of data until TLNomCode
column contains no data. The Sage Company imported into can be set in the
Setup window.
PostTrans ONLY edits those fields listed on the sheet when importing, thus
any existing values, on a record, are unaffected. New records may
have default values for certain fields.
Validation
Any values and associated codes will be invalid during import.
The cursor will be moved to highlight any problems in data.
POSTED Document Ref
After Posting a transaction, PostTrans will write "POSTED:" and the
transaction reference number in column A (tag TLPosted). Lines marked as
"POSTED" are then ignored by PostTrans when re-posting. So, transactions cannot easily be posted twice.
So the transaction can not easily be posted twice. The user would
have to remove "POSTED" from column A in order to post the transaction
a second time. The user would have to remove "POSTED" from column A, to post the transaction a second time.
Confirmation before Posting Transaction
Just before posting the validated transaction, PostTrans will optionally show
a transaction summary for the user to validate. This can be turned
off in Setup window.
File Import Button
This can be enabled in Setup to easily import CSV, or fixed length files, into sheet for importation. Formula can also be added, or macros/VBA
to manipulate this data before importation. Import from CSV file.
Clear Button
The Clear button will clear all values on the sheet, according to the row
just above the tag row, and copy down any formula. Clear Transaction and copy down formula
Evaluation and License
This functionality will work with Sage Demo data without a license. A license is required to import into any other Sage Company.
A subscription be purchased, and cancel on-line at any time very easily.
Pricing
What else can I do?
Other Sage 200 Extract/Import types
Frequently Asked Questions?
Got another question? It may well be covered on our Frequently Asked Questions page.
Not all of these tags/columns are needed. The table below lists the required and recommended:
Req = Field is required EOF = End of file, Stop when no more values
Head A header tag can be used in header section, before row 30, of the transaction template. Or in the rows data of data, below row 30, of the template like a traditional CSV importer.
With data type Yes/No fields, if cell starts with 'y' or 'Y' is taken as TRUE
Where ^ denotes a In Cell Code Search, delete ^ at end of tag, to turn off code search
All Text fields are trimmed (spaces before) by default. Add ' to the end of the tag name to stop this.
.
Related Example Sheets
You can easily access the example sheets by pressing Help button, on the PostTrans Toolbar to access these related examples, or downloading them from the links below.
To use the template, with Sage 200, install PostTrans. Download
Trial with Sage demo company. Purchase a month subscription for Live Sage Company. Price
Watch the On-line Training course on how to use and customise the templates.

 EXCEL · XLSX